
This lesson will review the arterial anatomy (there’s quite a bit) and ask a critical question of where you might find relevant pressure points to control bleeding. We will then focus on the subset of arteries that are useful in taking blood pressure. The next post will (finally) get to the physical process of taking blood pressure.
——————————————
But seriously, doc. I’ve been looking through this anatomy, and this stupid artery is the same stupid tube, that starts at the aorta, heads to the arm, and changes names about 10 times between the aorta and the finger. But it’s the same stupid tube. It’s like the streets in Houston (which this author knows quite well) that change names randomly despite it being the same stupid road. What’s the point?
The main point is to define the location. For some parts of that same stupid artery (SSA), there is a vein, or nerve, or muscle, that run next to it. For other parts of that SSA, it is solo. And it’s good to know, if you spot one thing that is hurt, what other things run along with it, that may be hurt too.
—————————————–
From a practical, day to day point of view, you are unlikely to need any more detail on arterial anatomy than that found on page 207 of the Kaplan book. But you really need to know that part quite well. Pages 213 & 215 give more detail in the anatomy of the arm and leg; this will be useful when trying to locate pulses and apply pressure points.
Also look at BioDigital for a fantastic, manipulate-able 3D rendering of the anatomy. You have to sign up but it is free, and they don’t spam you too badly. Rooting around there can really firm up what you are learning here, and extend to overkill levels of detail.
A solid pair of videos here and here discuss major arterial anatomy, for those that prefer videos to paper.
Assignment #1: Learn well pages 207, 213, and 214. Try to discern at what point the same blood vessels change names (hint: it’s almost always when they split, or cross a specific boundary, such as a joint, or a muscle, or whatnot). Get on BioDigital, and find all the arteries mentioned on page 207; also, find the Circle of Willis, and the arteries on page 213 and 215. Have someone quiz you by pointing out unknown arteries and having you spout out what they are. Penalize yourself when you are wrong–be that cash, coins (which is what we used in med school–what can I say, we were poor), food, beer, etc. The person that has the highest score takes home the pot.
Also, you should be able to feel pulses at the carotid, brachial, radial, femoral, popliteal, dorsalis pedis, and posterior tibial arteries. It is much easier to feel pulses on yourself than others; start with yourself, be sure that you can feel them, and acquire them quickly; then take pulses on willing others. The popliteal pulse is notoriously hard to find. Lots of great how-to videos on YouTube. Of note, finding a femoral pulse on another requires a certain amount of, ah…”friendship”.
Assignment # 1.5: Using a (hopefully) water soluble/non-permanent marking device, draw on your own body the course of the major arteries of the arms, legs, and neck. Bonus points for drawing the arteries of the chest and abdomen as well. Note well that you should use whatever pulses you can feel as reference points, and focus on getting the diagram correct. Using the BioDigital site, you can toggle the muscles on and off in order to give you reference points as to when things branch or come together.
————————————
For pressure points, it is helpful to realize that the heart and blood vessels can be simplified to 1) a pump, and 2) some tubing. If there is a hole in the tubing, you need to clamp between the hole and the pump, not after the hole. It is quite surprising how often I see folks holding pressure on an arterial bleed, distal to the injury. It needs to be proximal, folks. Otherwise they just bleed out.
I note that there are a few things on the diagram below (from the SOF Medical Handbook) I find to be impractical. It shows compression of the subclavian artery in order to stop a “wound of the shoulder/upper arm”. I’m telling you, from personal experience, that compression of the subclavian artery is nearly impossible. If you are going to try, you need to compress from both above and below the clavicle, and you have to push hard enough that your patient will most certainly complain.
Both the hand and the foot have backup arteries that can feed nearly the entire appendage with only one artery. The brain has 4 separate major arteries that feed into it. This brings up two points:
1) In theory, you will need to compress both arteries to stop bleeding in the hands or feet. In reality, sometimes folks have bad, narrowed, junky blood vessels and compression of the arteries can cause the hand to necrose–that is, die and rot.
2) IN THEORY, if you complete compress one of the blood vessels leading to the brain, then the other 3 can take up the slack. They all meet at the Circle of Willis, deep in the brain, which serves too pool all the blood from all 4 arteries and can, IN THEORY, feed the entire brain from just one artery. IN REALITY, frequently folks have nasty, narrowed, disgusting stenosis, and are barely holding on at baseline. Sometimes the only blood vessel they have leading to the brain…is the one that is bleeding. Compression of that vessel leads to all kinds of bad things. In an emergency, you have no choice, as they will die from blood loss if you don’t stop the bleeding. In a practice environment, however, you don’t compress this vessel without proof that at least one (and preferably all) of the others is/are working.
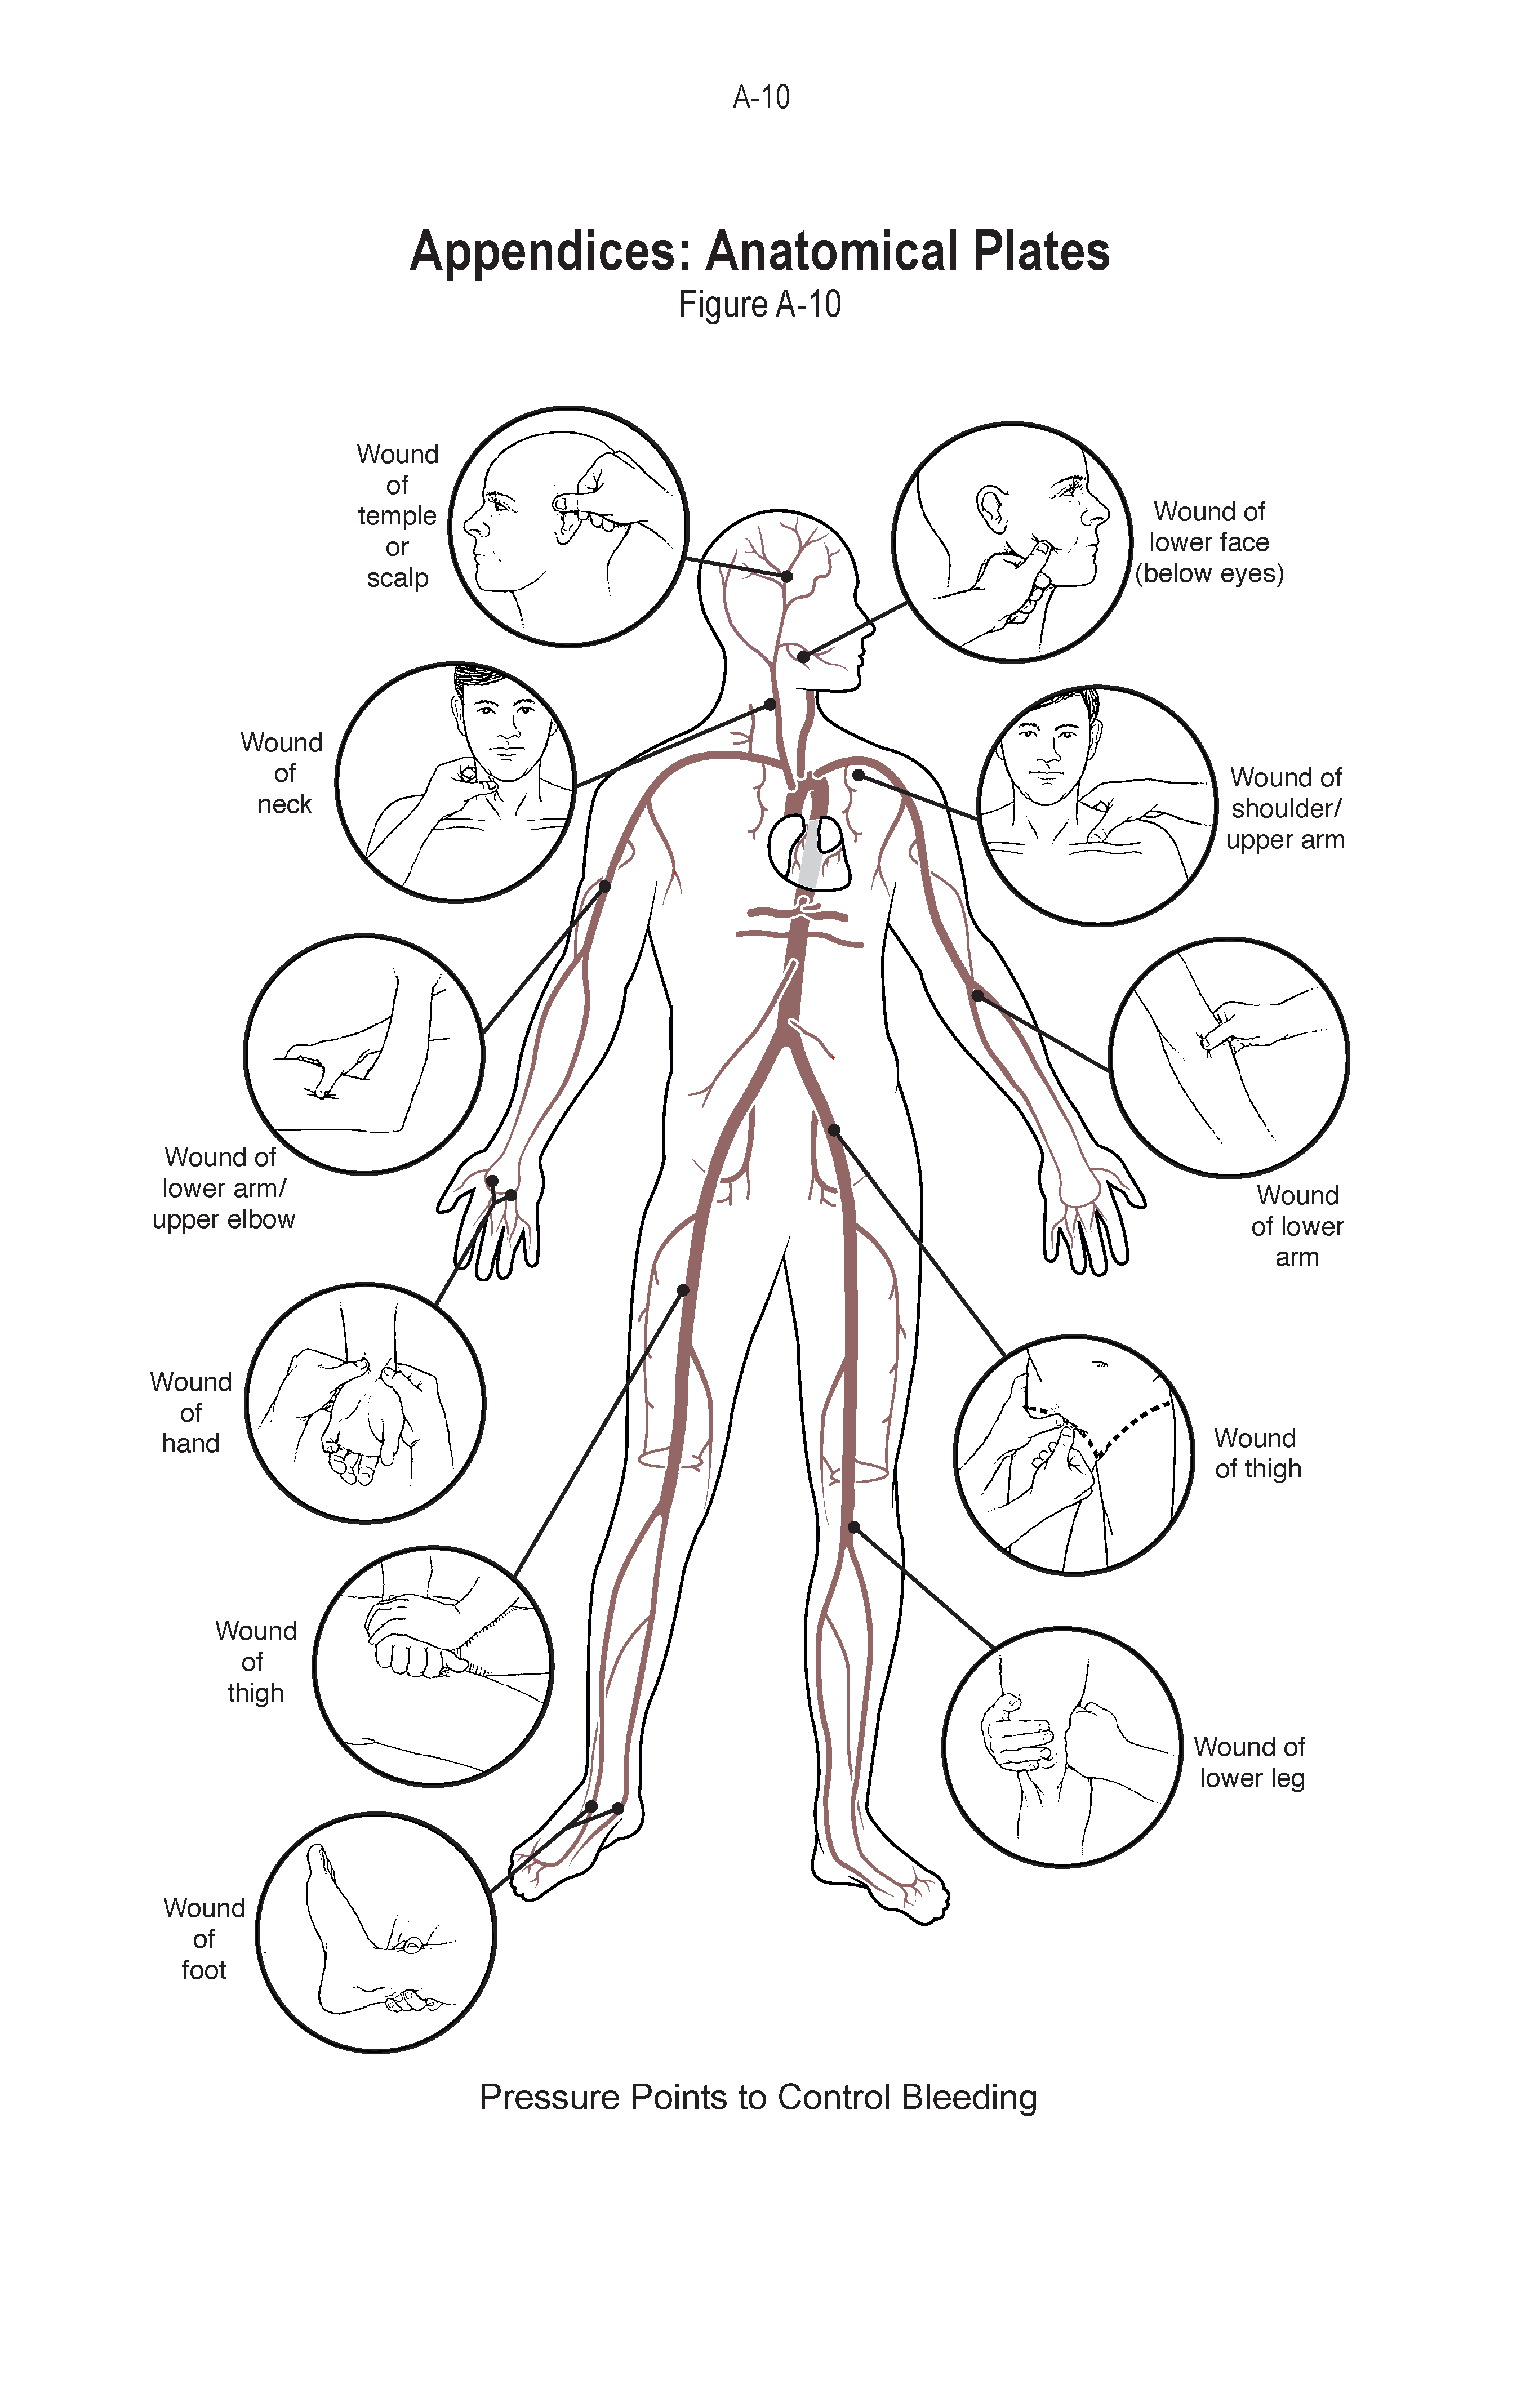
Pressure points
I would add to the above a technique to compress the abdominal aorta. The linked article describes, basically, driving your fist into the abdomen, just above the belly button, in order to compress the aorta in folks that have peripartum severe bleeding. I have also heard of this being used as a last-ditch effort in the trauma world. Nota bene it only works in about 50% of patients, and should only be used on patients that have an injury that is above the pressure points to the leg itself.
Mosby is always talking about “hips and heads” because hits to the hips are typically below the level of body armor, but too high to compress easily and certainly too high for a CAT-T. The above is a method that you might use should you or yours have an injury to the low abdomen. You can try it if the injury is higher, by compressing just below the rib cage in the middle, but all bets are off.
Assignment #2: This comes with caveats. If you have bad blood vessels, Raynaud’s, poor circulation, or any other blood vessel problem, don’t do this. For all the rest: Please locate a pulse, then find a pressure point proximal to that pulse. Then compress the pressure point. You should feel the pulse become more faint; you can also look for blanching of the limb in question. Once you can see that you have successfully reduced the flow, then let off pressure and feel the pulse return.
See this video for a description of the Allen’s test, which is a version of what I am asking you to do here. Watch closely to see the palm and hand pink up right after she releases the ulnar artery.
Do this for all the arm and leg pulses and points; these are the ones that can be useful in taking blood pressure. DO NOT do this to the carotid (neck) artery. DO NOT do the abdominal compression maneuver mentioned in the paragraph above. Both of these have significant risks (as mentioned above) that are not worth running if there is not a true emergency.
–Grouch
